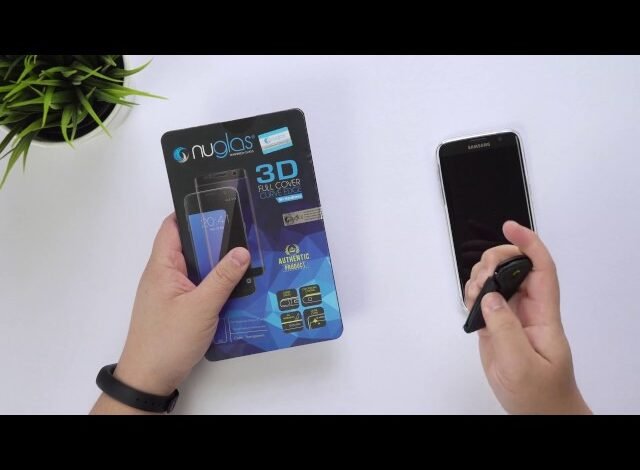
Unboxing the NuGlas UV Glue Glass Screen Protector

When you receive your NuGlas UV Glue Glass Screen Protector you’ll notice that the box contains several important items. These are all the things you need to install the screen protector properly and ensure it works great. Inside the box you will find the glass screen protector, a bottle of UV glue cleaning wipes, a dust removal sticker and a small UV lamp for curing the glue. The glass protector is thin but very strong and the UV glue is special because it helps to stick the protector securely to your phone or tablet.
Before you start it’s a good idea to check if everything is there and in good condition. Make sure the glass protector is free of cracks or dust. Take a look at the UV lamp to make sure it’s working. This step is important because without all the right tools the process might not go as smoothly. Once you’ve confirmed everything is there you’re ready to get started. Remember this is a simple process but it’s important to follow each step carefully to make sure the screen protector sticks properly and lasts a long time.
Preparing Your Device and Work Area
Preparing your phone or tablet for the NuGlas UV Glue Glass Screen Protector installation is an essential step that can make the process easier. First turn off your device so it doesn’t interfere while you’re working. This also helps to avoid any accidental touch inputs during installation. Next you need to clean the screen. Use the cleaning wipes that come with the screen protector to wipe away fingerprints, dirt or any oils on the screen. Make sure to wipe the screen until it’s completely dry.
Now that the screen is clean it’s time to find a good dust-free place to work. You don’t want dust getting stuck under the glass while you apply the protector as it can cause bubbles or air pockets. Choose a place with good lighting so you can see clearly. A clean desk or table works well for this. Lay out all the tools you’ll need so you can easily grab them. By getting everything ready you’ll ensure that the installation goes smoothly and that your NuGlas UV Glue Glass Screen Protector sticks perfectly.
Applying the UV Glue
Once your device is clean and ready it’s time to apply the UV glue. The UV glue bottle that comes with the NuGlas UV Glue Glass Screen Protector is designed for easy application. Carefully remove the cap and squeeze a small amount of glue along the edges of your screen. Be sure to spread the glue evenly but don’t overapply it. If you use too much glue it might spill out when you place the glass protector on the screen which can create a mess. The goal is to apply just enough glue to help the protector stick securely.
Once the glue is applied it’s time to place the glass screen protector on your device. Carefully align the edges of the protector with the edges of the screen. You want to make sure that the holes for the camera speakers and other parts of the device match up perfectly. Take your time with this step as it’s important to get the protector in the right position before the glue starts to dry. Once you have the protector aligned correctly you can move on to the next step of curing the glue.
Aligning the Screen Protector
Aligning the NuGlas UV Glue Glass Screen Protector correctly is very important. If the protector isn’t positioned right it might not cover your screen properly or it could even block some parts of your device like the front camera or speaker. After placing the protector on the screen take a moment to check if it’s aligned properly. Look carefully at the edges and make sure they line up with the edges of your screen. Also make sure that the cutouts for the camera and other features match up perfectly.
If you notice that the protector isn’t aligned properly carefully, lift it up and adjust it until it fits just right. This step is important because once you move to the next step the glue will start to set and it will be harder to adjust the protector. When you are happy with the alignment you can move on to the next phase of curing the glue with the UV lamp. Remember the better the alignment the more comfortable you will be with the final result.
Curing the UV Glue with the UV Lamp
Now that the NuGlas UV Glue Glass Screen Protector is aligned on your device the next step is to cure the glue. This is where the UV lamp comes in. The UV glue needs to be hardened and the UV light from the lamp does this by making the glue solid and strong. Place the UV lamp over the screen and turn it on. Hold the lamp in place for the recommended time (usually about 1 to 2 minutes) to ensure that the glue hardens properly.
During this step it’s important not to move the UV lamp around too much. The light needs to shine evenly on the glue to ensure it cures all parts of the screen protector. After the time is up you can check if the glue is fully cured by gently pressing the screen. If the protector feels firm and there are no loose areas the glue has cured successfully. If it feels soft or sticky you may need to cure it for a little longer. Make sure the glue is completely hardened before you move on to the next step.
Final Touches and Inspection
Once the NuGlas UV Glue Glass Screen Protector has been applied and the UV glue has cured it’s time for the final touches. Gently wipe the edges of the screen with a microfiber cloth to remove any excess glue that may have spilled out. This helps give the screen a clean and polished look. You should also check for any air bubbles that might be trapped under the protector. If you find any bubbles gently press them out toward the edges of the screen.
Take a close look at the installation to ensure there are no cracks or imperfections in the protector. If everything looks good, turn your device back on to check how the touch sensitivity works. Your device’s screen should be just as responsive as it was before the protector was applied. If everything is working smoothly and the protector is securely in place you’ve successfully installed the NuGlas UV Glue Glass Screen Protector!
Testing the Screen and Touch Sensitivity
After you’ve installed the NuGlas UV Glue Glass Screen Protector and let the glue cure it’s time to test the screen. First turn your device back on and check if the touch sensitivity is still working. The screen protector should not affect how your device responds when you touch it. Try swiping, tapping and using different gestures to make sure everything works properly.
If you notice any problems with touch sensitivity it may be because the protector wasn’t applied correctly or the glue didn’t cure properly. In this case you might need to remove the protector and start over. However if everything is working fine you’re all set! The NuGlas UV Glue Glass Screen Protector should now protect your screen from scratches and damage while keeping it fully functional.
Maintaining Your Screen Protector
To keep your NuGlas UV Glue Glass Screen Protector looking great and performing well it’s important to take care of it. Clean the protector regularly with a soft microfiber cloth to remove fingerprints, dirt and smudges. Avoid using harsh chemicals or rough cloths as they can scratch the surface of the protector. A gentle wipe will keep the screen clear and smooth.
It’s also a good idea to be careful with your device to avoid dropping it. While the NuGlas UV Glue Glass Screen Protector is strong and can protect against many types of damage a very hard fall or impact might still cause it to crack. If the protector does get damaged you can replace it easily. Just make sure to follow the installation steps carefully for the best protection.
Conclusion
Learning How to Install NuGlas UV Glue Glass Screen Protector is a simple and effective way to protect your device’s screen. By following the steps carefully from preparing your device and applying the glue to curing it with the UV lamp you can ensure a perfect installation. The NuGlas UV Glue Glass Screen Protector provides excellent protection against scratches and cracks while maintaining your screen’s clarity and touch sensitivity. Whether you’re new to screen protectors or have installed many in the past this method is easy to follow and ensures great results every time.


